
Skyrim Level Design Process
- mattbaileygamedesi
- Oct 25, 2020
- 16 min read
Updated: Dec 8, 2020
This post will feature images and captions showing my design process whilst creating my Skyrim Dungeon using Skyrim Creation Kit, in chronological order. The dungeon's main purpose is to provide a challenge to experienced Skyrim players by using difficult enemy encounters. It will be designed in such a way that it feels and plays like a real Skyrim level created by Bethesda. It must accomodate the wide range of playstyles that Skyrim allows for.
This project took approximately 72 hours spread over three weeks to complete, alongside other university projects.
My stretch goals for this project include:
World Hookup (Linking the Dungeon to the Overworld of Skyrim)
Quest Writing (Scripting a Quest for the Dungeon)
SECTION 1: BASIC LAYOUT
Map

I began by designing the base layout of the dungeon using Skyrim Creation Kit's modular assets. The dungeon will feature a Falmer cave area and Dwarven dungeon area. There are 13 rooms in total. The dungeon will lead to a large open cave populated with Dwarven architecture where the player must retrieve a powerful weapon and use it to defeat the final enemy encounter. At this point I have not added lighting, cover, enemies or intricate architechture. This will come at a later stage in the project.
Note that I did not use paper prototypes to initially design the level. Having listened to Bethesda's Senior Designer Joel Burgess' GDC talk, I discovered that Skyrim's levels are not prototyped with paper maps. They adopt a more freeform and organic approach to level design that relies heavily on testing and iteration.. This is because the engine does not allow for greyboxing due to it's modular nature and Bethesda have found success in adopting a trial and error approach to level prototyping. I adopted this same workflow in order to keep my dungeon feeling as close to a real Skyrim dungeon as possible. I will be playtesting and iterating after each change is made in order to achieve the best results possible in the time that I have.
Room 1


Room 1 will introduce the player to the Falmer enemies with two relatively easy enemies to take care of. It features a raised platform that the player may make use of to evade enemies and use ranged weapons.
Room 2: One Way Valve

Room 2 features a high ledge that the player must drop down from. It is impossible for the player to climb back up. This provides a "point of no return" and is intended to make the player feel tense. It will also provides the player with a good vantage point over the rest of the room to gather information about the enemy encounters ahead.
Large Falmer Cavern


This is the final area of the Falmer cave section. It is a large space designed to accomodate a horde of enemies that should greatly challenge the player. The entrance to the Dwarven dungeon section can be easily seen and will be well lit to draw the players eye. This area will feature more raised areas where multiple ranged enemies will be placed to attack the player as they pass through. It will also feature many areas for cover and choke points to allow the player to defeat the large number of enemies.
Dwarven Halls and Corridors

This is the first hall in the Dwarven area of the dungeon. There are two optional loot rooms off to each side. I will showcase these in the next section when I have added cover and loot to the level.


The Dwarven area of the dungeon features multiple tight, decending corridors to provide choke points and areas where one-on-one melee combat and stealth is favourable. It also features wider open spaces with long lines of sight where magic and archery may be of use.
Final Area

This is the final cavern space and the end goal of the level. It will provide a large space in which the player must defeat multiple boss enemies at once using one of the powerful weapons placed at the center. It will be quite dark and feature very grand Dwarven architecture that should make the player feel small and provide a sense of looming danger.
SECTION 2: COVER, LOOT ROOMS AND ARCHITECTURE
Map with Added Cover and Architecture

At this stage in the project I added cover, loot, clutter and architecture to make the level more playable, provide the player with various tools to overcome the challenging encounters and make the space look and feel more real.
Room 1

Room 1 now features more clutter as well as some loot to entice the player into exploring the dungeon further.
Falmer Loot Room

This is a screenshot from a room that branches off from the corridor to the large cavern. It features some health potions and a high tier loot chest that may help the player in the cavern. This aims to reward the player for optional exploration.
It also features a human skeleton to provide some element of environmental story telling. Clearly adventurers that have ventured into these caves before have been met by a terrible fate.
Large Cavern Cover, Clutter and Choke Points


The large cavern now features multiple pillars and rocks that break up the open space. This makes the route to the Dwarven section more difficult and also provides the player (and enemies) with cover from ranged fire and choke points to make it easier to pick off enemies one at a time.
Optional Loot


The large cavern now features multiple Falmer tents. These make the cavern feel lived in, like a mini civilization. They also provide the player with loot that rewards exploration and gives the player more resources with which to complete the level.
Raised Areas


The cavern now features multiple raised ledges with cover that the player may choose to use for ranged engagements. They also provide cover and hiding places for the enemies so that the player may not notice how large the force of enemies is upon entering the room.
Cavern Choke Points

The entrance to the cavern is quite small, which can be exploited by the player as a choke point.


Pillars and rocks are placed in such a way so that choke points are created.
Dwarven Loot Room
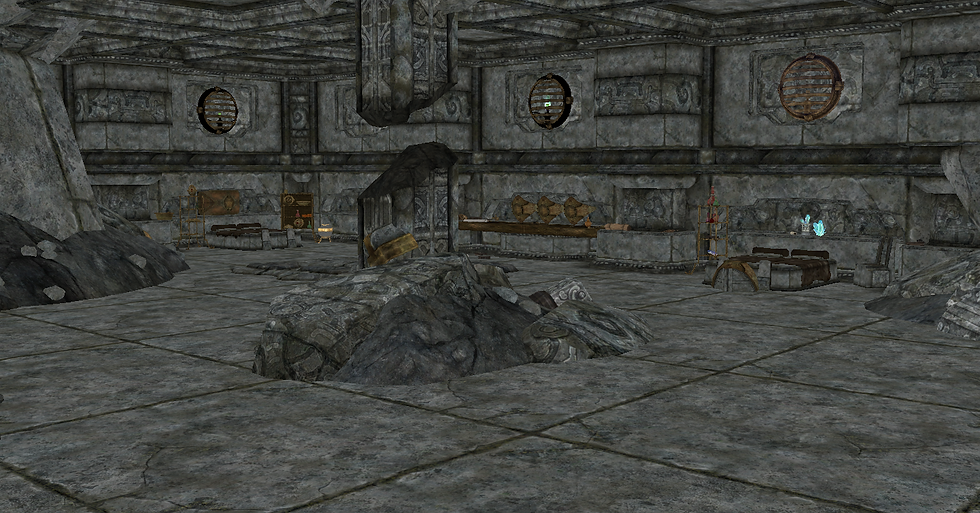
This is one of the two Dwarven loot rooms that the player is greeted with upon entering the Dwarven Halls. There will be a minimal amount of enemies here to provide some downtime after the previous large encounter. The large amount of loot should feel rewarding to the player after fighting through the horde in the cavern.
Forge Room

This is a forge room that features many weapons and pieces of armour. This will allow an under-equipped player to stock up on equipment and prepare themselves for the rest of the dungeon.
There will be an increased amount of enemies in this space so that the player is made to fight if they want any loot.
Potion Room

This is a locked potion room in the next section of the Dwarven dungeon. It has many powerful potions that may assist the player. However the player must pick the master level lock to enter and claim their prize. This should bring about a good sense of satisfaction for a player that manages to claim the loot.
Cluttered Corridors

The corridors now have extra clutter to create an even tighter space. The player will encounter powerful enemies in these corridors to provide some intense action and provide choke points for the player to utilize.
Grand Architecture
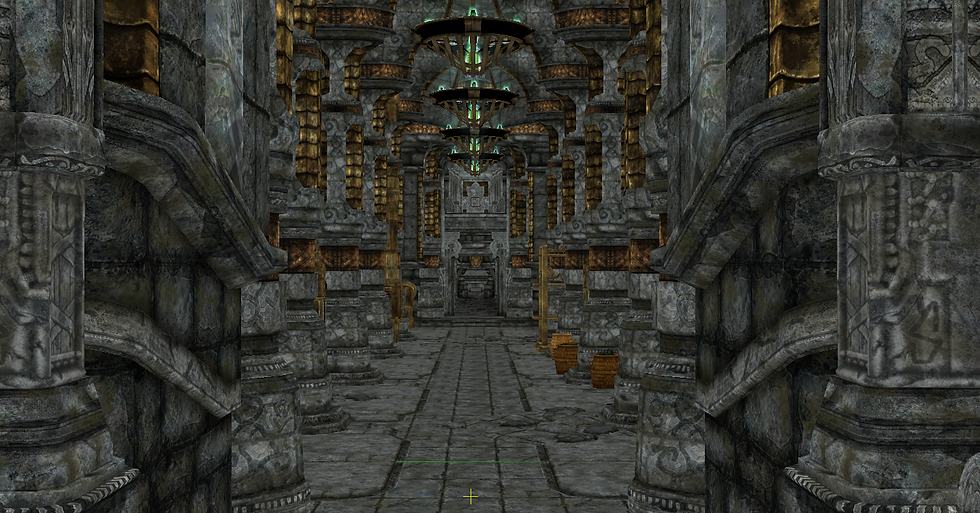
Towards the end of the level the architecture becomes grander and gives the player a sense that they are nearing their goal. The rows of pillars in the screenshot above draw the player's eye to the door at the end of the hall and also provide hiding places for enemies to ambush the player from as they pass through.
Final Dwarven Cave - Architecture

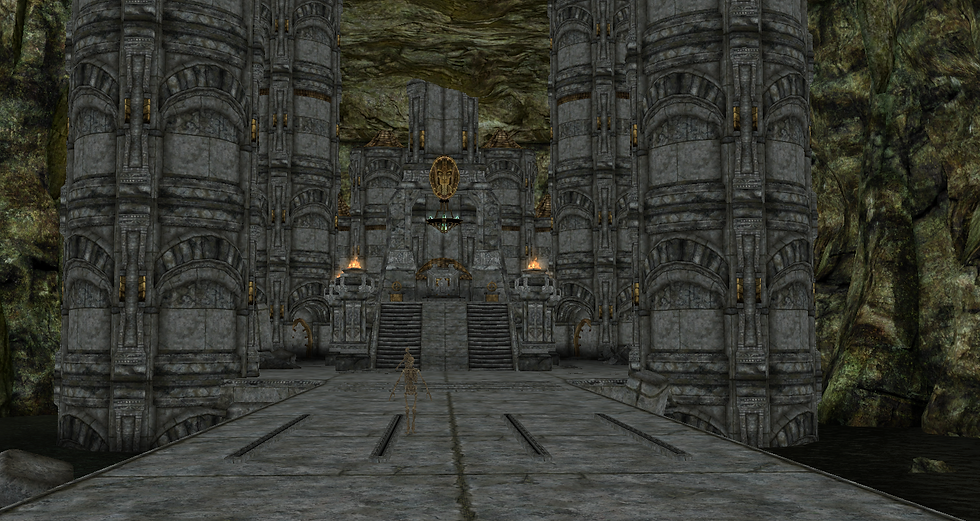
The final dwarven cave now features huge towers as well as a large pedestal in the center from which the player can retrieve the powerful weapons. The platform is now surrounded by a dark lake which should provide a feeling of isolation. There is a large Centurion Bust above the weapon pedestal to make the player feel that they are being watched.
SECTION 3: LIGHTING, HIDDEN TREASURE AND TRAPS
In this section I added lighting to the level to provide more immersion and ambience. I also utilise it to guide the player through the level and draw their eye to hidden loot.
Room 1

Room 1 now sets the scene for the rest of the Falmer cave by featuring glowing mushrooms and low light levels. This creates deep shadows that should increase the feeling of tension within the player. I also added swirling mist throughout the level to give it a mysterious ambience. This is intended to increase the sense of tension in the player and make the space feel more like a real environment.

The glowing mushrooms and a beam of light coming from outside the cave draw the player's eye to the room's exit.
Room 2

Room 2 now features a light beam that highlights a chest within one of the tents. The flame coming from the campfire and some more glowing mushrooms draw the players eye to the exit.
Large Cavern


The entrance to the Dwarven dungeon is now surrounded by huge glowing mushrooms to clearly show the player where they are meant to go. There is also minimal lighting in this area to create deep shadows where enemies can hide out of sight and surprise the player.
Dwarven Ambience
The lighting is slightly warmer in the Dwarven section of the dungeon to remain in keeping with how light is used in different areas by the original Skyrim devs. This aims to keep the dungeon feeling like it belongs in the world of Skyrim. I still use minimal lighting, again to create those deep shadows.

A Centurion Bust looming out of the darkness for a sense of eerieness. The oil puddle on the floor can be ignited using magic or a bow with a flame enchantment to damage any nearby enemies.
Centurion Trap 1


To enter the locked loot room on the left the player must pull the lever on the right highlighted by a spotlight. This will also activate the sleeping Centurion so that the player will have to overcome a challenge to collect the loot.
Centurion Trap 2


A similar situation to the previous screenshot, a Dwarven Centurion lurks in the darkness waiting to activate when the player opens the chest on the left. The light should draw the player's eye away from the Centurion so that it startles the player when activated.
Chest Fire Trap

This is a trap that features a high tier loot chest that triggers four flame pillars upon activation.
This can do a large amount of damage to the player. To signify the danger there is a Centurion Bust glaring down at a burnt corpse of a previous unlucky adventurer. This also provides some environmental storytelling.
The player may pick the lock on the trap to disengage it. I may change the activation for the trap to a pressure pad instead so that the pillars stay active for longer and deal more damage.
Ballista and Thresher Trap


To enter the final room the player must pull a lever. This lever also activates three ballistas aimed directly at the lever. The player can avoid damage from these by utilizing the whirlwind sprint shout. The lever also activates multiple thresher traps in the final room that the player must navigate through before reaching the center.
Locked Door and Lever McGuffin


To pass this locked door the player must locate the lever positioned above in the next section of the level. This leads the player through some tight corridors with difficult enemy encounters and optional loot rooms. One of these is the aforementioned potion room.


The lever is positioned next to a bright light, the only light in the area. This should draw the player's eye to it and the player will then realise that they need to find a way up to the lever.
The player may drop straight back down to the door after activating it to avoid a tedious walk back through the corridors.
Dwarven Cave Lighting

The weapon pedestal in the center of the Dwarven cave is now surrounded by four lit braziers and a large Dwarven gas lamp. This lights the platform well and makes it stand out from it's surroundings, signifying to the player that this is where their objective lies.
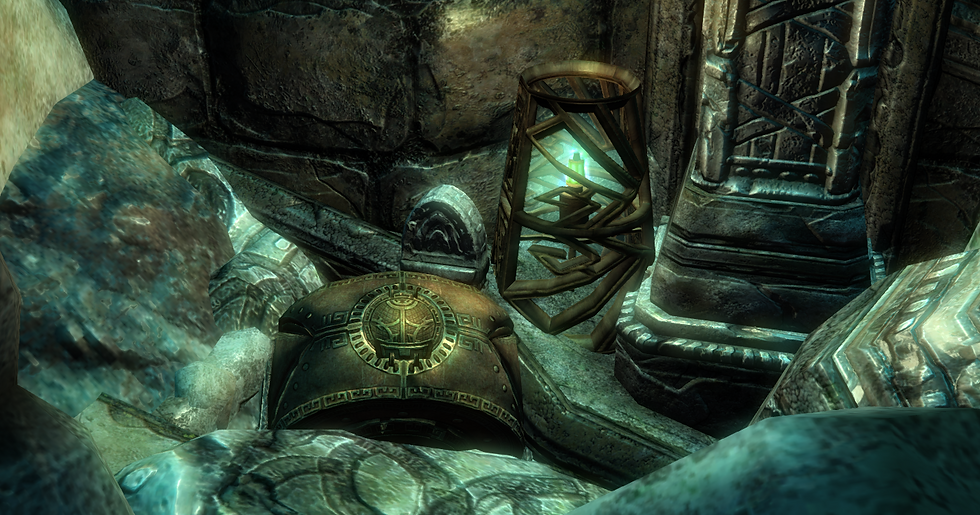
Hidden Treasure 1


A light is positioned behind some rubble in one of the first Dwarven loot rooms. If the player decides to check it out they are rewarded with some loot. A powerful fire resistance potion is placed here that will be useful for overcoming the aforementioned fire trap later on in the level.
Hidden Treasure 2

Another chest hidden behind some rubble with a light to pique the players interest. This contains some high tier loot that the player may find useful.
Hidden Treasure 3


A treasure chest hidden at the bottom of the lake in the Dwarven cave. There are no lights to guide the player here so it must be found from a desire to explore the lake floor. This is here to reward players with more of an explorative streak.
SECTION 4: ENEMY ENCOUNTERS, NAV MESHING AND OPTIMISATION
In this section I plan and implement the enemy encounters in the engine. I reverse engineered paper level designs for each room/area and used them to plan out the enemy encounters. This allowed me to visualise the encounters and plan how they might interact with the level and player. They also provide some insight into my design rationale.
Paper Level Designs for Planning Encounters


Implemented Enemy Encounters

The coloured dots around the map represent the implemented enemies in the level. Green signifies an enemy of easy difficulty, yellow is medium, orange is hard and red signifies an enemy of the hardest difficulty.
I decided to use "Leveled Actors" instead of base enemies with set stats as this means that the enemies in the dungeon will scale in difficulty depending on the player's own level. This means that the player should find the dungeon challenging, yet completable, at any level they choose to enter (so long as they have the appropriate gear). Challenging at level 1 with no skills or perks would not go too well however.
Nav Meshing

As can be seen above, the level had to be Nav Meshed in order for the enemies to find their way around the map. It tells them which areas are walkable and which areas can be used as cover.
I Nav Meshed the entire level by hand, as SCK's automatic Nav Mesh Generator is not very accurate or very optimized and ends up creating thousands of small triangles that don't need to be there, causing the dungeon to lag. I found it was faster to create the Nav Mesh by hand, from scratch, rather than using the generator and cleaning up the generated mesh.

As can be seen above, I opted to use fewer, larger triangles in order to keep the dungeon well optimized.
Upon completing the Nav Mesh, I was able to playtest the encounters. I found that I had planned my encounters well as I didn't need to change anything about the enemies or their positioning. The encounters felt challenging, meaningful and rewarding right off the bat. Of course I will be doing some external playtesting and may change some things about the encounters if the gathered data suggests that it is needed.
Room Optimization

Next I created room markers and portals as can be seen above, to further optimize the dungeon. These markers ensure that nothing outside the marker that the player is in will be rendered, saving on performance and increasing framerate. The markers also allow me to change the ambient lighting settings within each individual room. This allowed me to change the lighting to a warmer setting for the Dwemer area of the dungeon to remain in keeping with the pre-established themes in Skyrim.

Between the markers are "portals". These allow the engine to render objects that the player can see through the portal, so that the player can see outside of the room into corridors or the next section of the level, instead of a blank void.
SECTION 5: CUSTOM WEAPONS
Next I added some additional custom weapons to the table in the centre of the boss room to accomodate different playstyles. There should now be a powerful weapon suited to any kind of player which will assist the player greatly in taking down the four Centurions.
Custom/Unique Weapons

As can be seen above, I have added a one handed sword, a bow, a destruction tome and a two handed battleaxe.
Unique Battleaxe - "Centurion's Bane"

Above are the modified stats for the unique battleaxe. It is more damaging, swings faster than a normal battleaxe, has a higher crit multiplier, does more crit damage and has an elemental fury enchantment attached.
Unique Bow - "Repeating Downfall"

Above are the modified values for the unique bow. It is more damaging, has a higher crit multiplier, higher crit damage, a higher rate of fire and a powerful stagger enchantment which allows the player to kite multiple enemies more effectively.
Unique Sword - "The Core Piercer"

Above are the modified values for the one handed sword. It is more damaging, has higher crit damage, a higher swing speed and a powerful absorb health enchantment to help keep the player alive.
Unique Spell - "Angthbandz Lightning"

Above are the modified values for the modified Sparks destruction spell. I chose this spell as nothing in the game has a natural resistance to this kind of magic. It has much higher damage, ignores all resistances and cannot be absorbed or reflected. It is essentially a far more powerful version of the Sparks spell.
Having playtested these against the boss encounter I can confirm that (for me) they greatly increase the player's chance of defeating it whilst still maintaining a high level of challenge. However, upon external playtesting I may make changes based on the data gathered.
SECTION 6: PLAYTESTING FEEDBACK AND BUG FIXING
After completing the custom weapons I created and sent out a playtesting feedback form along with a steam workshop link for the level to the Games Academy discord server.
This was so I could gather feedback from people who are not only experienced Skyrim players but also know a thing or two about level design, and make iterations based on the feedback.
Here is a link to the form I created: https://docs.google.com/forms/d/e/1FAIpQLSdEjjIupMKbFzzMtgBNYMD6xJX9ig9Uqkr5QHV2WQxsNMeQLg/viewform
I recieved 10 responses and the feedback that I gathered was largely positive, with most people agreeing that the dungeon was suitably challenging, felt like a Skyrim level and catered to their specific playstyle as can be seen from these results graphs below:


There were some players who felt that the dungeon was too hard in places, mainly due to the large Falmer horde encounter. Here are the responses of those who felt this way:

I admit that the Falmer horde encounter is exceptionally challenging as I also struggled with it whilst playtesting. In response to this feedback I am going to reduce the number of Chaurus enemies as they are the most difficult to defeat and slightly lower the number of enemies in this particular encounter. I will also take a second look at the Dwarven Sphere encounter mentioned above and tweak the difficulty of these enemies.
Falmer Horde Room Iteration

As can be seen here, I have brought down the level of most enemies by one stage and slightly reduced the number of Chaurus enemies. Upon playtesting this myself I can confirm that it makes this area more completable, but it still offers a significant challenge.
Dwarven Spheres Difficulty Iteration

As can be seem above, I changed the Dwarven Spheres mentioned by one of the playtesters to a lower difficulty. This made the encounter less challenging, however with two enemies it remained fairly difficult.
Fire Trap Iteration
Some users found that the fire trap did not damage them enough. After playtesting it again, it seems that this is because the trap does not activate for long enough.


In order to fix this issue I opted to use a trigger box to activate the trap instead of the chest trigger. This way the trap will be active indefinitely as soon as the player gets near enough to the chest to access it. This means that the player will take a lot more damage and must get in and out of the chest area quickly if they want the loot.
Fixing Room Bounds
I asked my playtesters if they encountered any bugs or glitches when playing. These were their responses:

I playtested myself to see if I could find any of these bugs too and it became apparent that there were indeed some issues with objects not rendering between rooms. I discovered that this was because there were a couple of very minute gaps between the room markers which I fixed easily.
Fixed Room Markers

I found that the mentioned missing floor piece was also due to the object being slightly outside the room marker. This was solved simply by extending the marker.
Fixing the Final Encounter
It was mentioned that the door to the exit lift would not open after the player defeated the final encounter (as seen above). Upon playtesting the final encounter again it became apparent that there was another issue aside from this, only two Centurions would aggro the player at once. Two of them would simply stand about and watch the player. I playtested multiple times and this never changed. I can only assume that only two "ambush" type enemies can aggro the player at once due to some restriction in the game's base code.
Lift Key

The door issue was a simple fix. The game's inbuilt "OpenDoorOnDeath" script would not work for reasons unknown to me, despite troubleshooting on multiple forums. So, to make it so the player had to defeat the encounter before proceeding I created a custom key that could be looted from one of the Centurion's corpses upon completing the encounter. This key will allow the player to unlock the lift door and exit the dungeon, as seen above.
Custom Centurion Enemy
In order to fix the final encounter and enable all four Centurions to attack the player at once, I created a duplicate Centurion enemy so that I could customise the attributes without changing every Centurion in the game.
Custom Centurion Enemy

In order to make all four attack the player I could not use an "ambush" type enemy, so I had to disable this script. I changed their aggressiveness setting to "Frenzied" and their confidence to "Foolhardy" so that they would relentlessly attack the player, as seen above.
This came with the downside that they could no longer be activated from a trigger and would simply activate when the player got within aggro range. However, upon playtesting I realised this had much the same effect of startling the player when they are approaching the weapons podium. It allows the encounter to be far more intense, so this works in favour of the overall design.
SECTION 7: STRETCH GOALS - WORLD HOOKUP
I was able to achieve my first stretch goal to hook the dungeon up to the overworld as I was able to manage my time effectively thus far. Below are some screenshots featuring the entrance and exit to the dungeon.
This makes the project more playable and means that players that download the mod from steam workshop don't have to go through console commands to access the dungeon.
I also decided to name the dungeon Anthzmar Caverns. This name takes inspiration from the Dwemer naming conventions already in the game and I think it sounds quite mysterious and threatening.
Anthzmar Caverns Entrance - Map

The entrance to the dungeon is located near Riverwood, one of the first towns the player will encounter in the game. This means the dungeon can be accessed reasonably early on. However, players that wonder in too early will find themselves greatly under leveled for the challenge.
Anthzmar Caverns Entrance - Overworld

I tried to make the entrance feel quite ominous and looming. The rock formation casts some long shadows and leans over the player making it seem quite imposing.
Skeleton of an Explorer

Lying just outside the entrance of the dungeon is the skeleton of a dead explorer. He is surrounded by Falmer arrows, hinting that he fell to the Falmer inside the cave and acting as some environmental storytelling. He has a note next to him that the player can pick up and read.
The Lost Note

This note provides some background information about the character and mentions his fallen friends. My intention here is to provide more environmental storytelling as the player will assume that the multiple dead bodies in the caverns are this explorers fellow adventurers. The fact that they all perished alludes to the high difficulty of the enemy encounters. The note also provides incentive for the player to enter the dungeon as it mentions the "lost weapons" that lie within. The player should naturally assume that these weapons are quite powerful and/or valuable as these adventurers risked their lives to find them.
SECTION 8: FINAL WORD - WHAT HAVE I LEARNED?
This project has been very enlightening for me in a multitude of ways.
During the creation of this project I have learned and practiced:
Bethesda's level design process.
Effective creation and population of levels with encounters using an industry standard, purpose built game engine.
Effective optimization of levels.
Effective pacing of levels and enemy encounters.
Creating a level with a specific design goal in mind, in this case, difficult enemy encounters.
Using environmental storytelling effectively.
Playtesting, gathering feedback and making iterations based on feedback.
Using modular level design kits.
This project has enabled me to create a level that I am really proud of for one of my favourite games of all time. It has only increased my passion for level design and I can't wait to make more Skyrim mods and levels for other games in the future.
The mod can be downloaded and played from this link: https://steamcommunity.com/sharedfiles/filedetails/?id=2291207998
Comments